
From Worn Blue Siding to Abyss Black


A siding transformation can look like a simple color change when the finished home is the only part people see. The Teresa project in Topeka shows the work that comes before that result. The home began with worn blue lap siding and visible deterioration around several seams and openings. The new exterior uses LP SmartSide ExpertFinish siding in Abyss Black, but the strongest part of the story is everything the crew had to inspect, prepare and coordinate between those two views.
For homeowners considering siding replacement, this project is a useful reminder: the selected finish is only one part of the plan. Removal, wall conditions, weather protection, trim, windows, penetrations and roofline transitions all affect how the final elevation looks and how complete the scope needs to be.
What This Topeka Siding Transformation Revealed
Before work began, the blue siding showed its age across the elevation. Some areas looked more worn than others, and the details around windows and edges no longer read as one clean system. Those visible conditions helped start the conversation, but the outside surface could not show everything behind it.
That is why a siding estimate should begin with the full elevation rather than a color sample alone. The contractor needs to understand the wall layout, openings, utility penetrations, corners and roof transitions before building a realistic scope.

Before — worn blue siding on the verified Teresa home in Topeka.
Removing the Old Siding Made the Wall Conditions Visible
Once the existing siding was removed, the crew could see conditions that were not fully visible from the yard. The project photographs document exposed sheathing and aged material around portions of the wall and window areas. This inspection stage matters because new siding should not simply hide a condition that needs attention.
Not every home will reveal the same needs, and a photograph cannot replace an on-site inspection. However, homeowners should expect the removal stage to confirm whether the wall is ready for the next layer or whether preparation work belongs in the scope. Building that possibility into the conversation creates a clearer plan before the new finish covers the wall again.

During — removal exposed the wall so its condition could be inspected before installation continued.
Wall Preparation Came Before the New Finish
After removal and inspection, the wall needed to be prepared for the new exterior system. The progress photographs show protective wrap across the elevation and the openings defined before the remaining siding was installed. This is the stage where the wall surface, moisture-management layer and installation layout must work together.
Preparation also gives the crew a chance to plan how courses will meet windows, doors, corners and other interruptions. Those details may look small in isolation, but they repeat across the house. When the spacing and transitions are consistent, the finished siding looks intentional from one end of the elevation to the other.
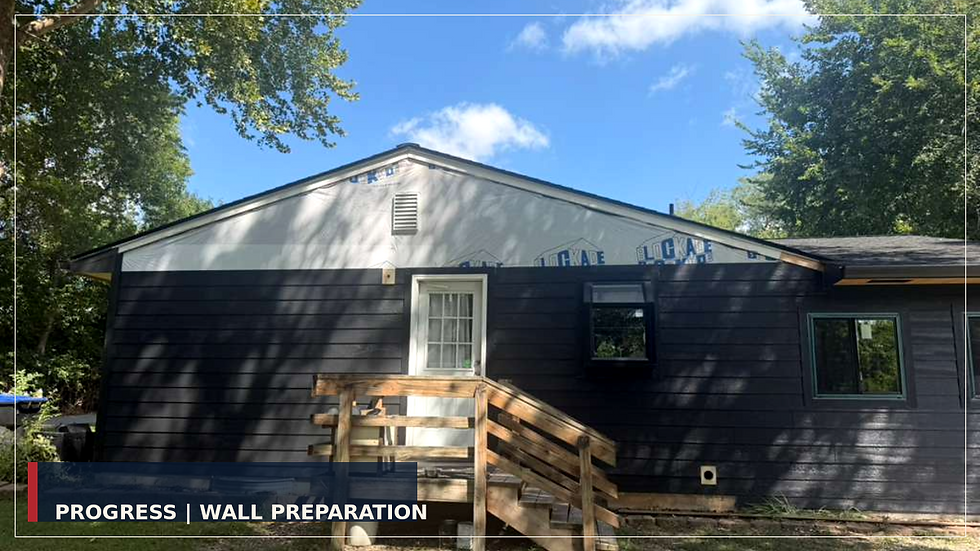
Progress — wall preparation and protective wrap before the upper courses were completed.
LP SmartSide ExpertFinish in Abyss Black Changed the Exterior
The Teresa home received LP SmartSide ExpertFinish siding in Abyss Black. The deep black finish gave the home a much bolder appearance and made the horizontal siding lines more prominent. Against the surrounding lawn and mature trees, the darker exterior feels grounded and deliberate.
A factory-finished color provides a consistent starting point, but it does not remove the need for a complete installation plan. Each cut, joint, corner, opening and penetration still needs to be handled according to the product requirements and the conditions of the home. The color creates the visual direction; the installation details determine whether the elevation reads as one coordinated result.
Clean Window and Trim Transitions Complete the Siding View
Windows and trim create repeated visual breaks across an exterior. On this project, the black trim around the windows works with the Abyss Black siding instead of interrupting it. The result is strongest where the lines stay consistent and each opening feels connected to the wall around it.
The same principle applies at doors, utility penetrations, corners and roof edges. A homeowner may begin by asking about siding, but the finished view includes every place where the siding meets another part of the house. Those connections should be discussed before installation, not treated as an afterthought.

Finished siding elevation — LP SmartSide ExpertFinish in Abyss Black with coordinated window trim.
What Topeka Homeowners Can Learn From This Project
· Start with the complete elevation. Color matters, but openings, trim, corners and roofline transitions belong in the same conversation.
· Expect removal to confirm the wall condition. Some preparation needs only become visible after the old siding comes off.
· Ask how the installation will handle repeated details. Consistency around windows, joints and penetrations affects the final appearance.
· Discuss timing early. An estimate can clarify the scope and product choices before the colder-weather schedule becomes tighter.
Plan Siding Work Before Colder Weather
Kansas weather becomes less predictable as fall moves toward winter. Starting the estimate conversation now does not require you to know every detail of the project. It gives the contractor a chance to inspect the home, understand the elevations, discuss product and color options, and outline what preparation may be needed.
If worn siding, damaged areas or an exterior color change is on your list, send Veterans Siding & Exteriors of Kansas a message with the word ESTIMATE, your city and SIDING. We provide free estimates in Topeka and surrounding Kansas communities and can help you begin with the complete exterior plan.
🗺️ Areas We Serve in Kansas
Veterans Siding & Exteriors of KS proudly serves homeowners throughout:
📍 Topeka, KS
📍 Meriden, KS
📍 Lawrence, KS
📍 Kansas City, KS
📍 Surrounding Kansas communities
👉 Looking for a contractor near you? Reach out—we may already service your area.
⭐ Trusted by Kansas Homeowners
We’re proud to be a trusted local contractor known for quality workmanship, honest recommendations, and helping homeowners create functional, beautiful spaces.
⭐ Organic 5-Star Reviews from Kansas homeowners
Veterans Siding & Exteriors of KS📞 (785) 433-5020
🏠 Popular Services
Homeowners contact us for:
❓ Frequently Asked Questions
Q: What areas of my home should I inspect each spring?
A: Focus on siding, windows, doors, gutters, fascia and soffit, sealing flashing and sealing exterior vents, and any other areas where water can enter the home.
Q: What small exterior issues should homeowners fix right away?
A: Loose siding, cracked caulking, small gaps, peeling paint, and clogged gutters should be addressed early before they lead to larger repairs.
Q: What are common signs of hidden damage?
A: Watch for water stains, soft or rotted wood, mold or mildew, gaps around windows or doors, and unexplained drafts.
Q: Can small maintenance issues really turn into expensive repairs?
A: Yes. Small issues that are ignored can gradually lead to water intrusion, structural damage, rot, and larger replacement projects over time.
Q: How often should I inspect the exterior of my home?
A: A full visual inspection at least twice a year—typically spring and fall—is a good habit and can help catch problems early.
🏠 Stay Ahead of Bigger Problems
Owning a home comes with ongoing maintenance, but catching small issues early can save significant time and money later. Our Homeowner’s Checklist series is designed to help you learn what to look for and how to handle simple maintenance items before they become major repairs.
Need help with something beyond a small fix?
📞 Call or text: (785) 433-5020

Comments